
Facebook is only one of the many places where we conduct business.
And just like any other place whether that be a file cabinet in an office or virtual workspace (like on Google Drive), there’s so much vital data stored that it pays (big time) to keep it secure.
Yet many people don’t have all or even any of the crucial steps set up, putting them in danger of potential hacks.
After speaking with multiple reps about this issue and experiencing firsthand some account shutdowns — I started taking these steps much more seriously for myself and anyone I add to my team.
Here are the steps I recommend taking right away to protect your account from being hacked or disabled by Facebook due to a lack of security measures in place.
Let’s get your Facebook Business Manager safe and ready to make you money securely!
Table of Contents
Securing Your Personal Facebook Profile
First let’s go over securing your personal profile.
Step 1: Enable 2-Factor Authentication
Make sure you turn your 2-factor authentication on. I can’t tell you how important this is.
2-Factor Authentication (2FA) is a security feature, giving protection for your Facebook account and password.
After you have it set up, each time a login attempt is made on your account by an unrecognized device, you will be asked to approve the login.
The instant alert feature can be enabled and/or disabled depending on what you prefer.
1. Visit ‘Settings & privacy’

2. Click ‘Settings’
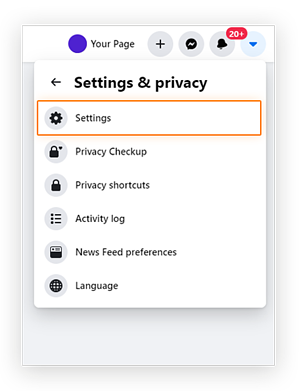
3. Click ‘Security and login’

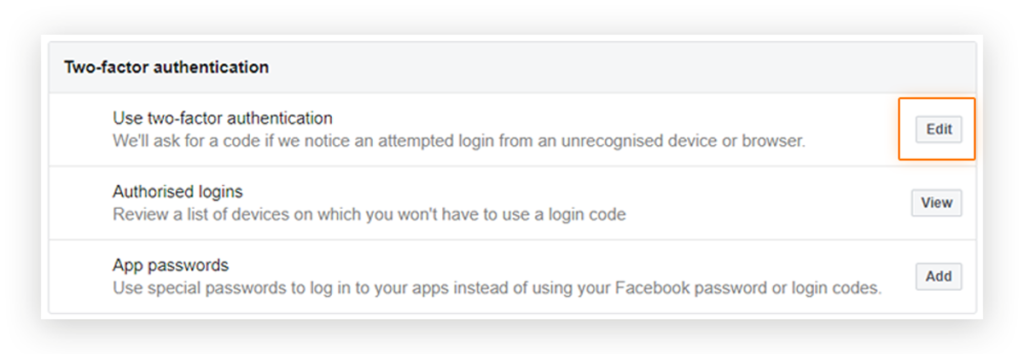
4. Under ‘Two-factor authentication’ you should find ‘Use two-factor authentication’ – click ‘Edit’
Step 2: Confirm Your Identity
If you’re going to run ads about social issues, elections or politics you need to confirm your identity.
- Your ID must be from the country where you want to run ads, and the name of that country must appear on your ID.
- If your ID has an expiration date, the ID must not be expired.
- Accepted ID types differ by country. Check which forms of identification are accepted in the country you wish to run ads.
You can visit Facebook’s Business Help Center to learn more about ads with political content.
Step 3: Set Up Trusted Contacts
Choose 3-5 contacts (close friends/family) to help you regain access to your account if you get locked out.
Facebook sends your trusted contacts a recovery code & URL that you can use to get logged in again.
To choose your trusted contacts:
- Go to your Security and Login settings.
- Scroll down to Choose 3 to 5 friends to contact if you get locked out and click Edit.
- Click Choose friends and follow the on-screen instructions.
After you’ve chosen your trusted contacts, you can always click Edit to change or remove the friends you’ve chosen.
Step 4: Turn On Alert Logins
Make sure you turn your alert notifications on about any unrecognized login activity.
To get alerts about unrecognized logins:
- Go to your Security and Login Settings.
- Scroll down to Get alerts about unrecognized logins and click Edit.
- Choose where you want to receive your alerts, such as from your email account or with a Facebook notification from a recognized device.
- Click Save Changes.
Step 5: Make Sure You Only Have One Profile
Facebook doesn’t allow users to have more than one personal account – it’s against their Terms of Service. So if they find out you have two personal accounts, they’ll shut them down.
Step 6: Beware Of Unrecognizable Links
If you get an email that you’re not sure is from Facebook DON’T click on it.
You can always confirm whether an email claiming to be from Facebook is authentic by reviewing recent emails they’ve sent in the Security and Login Settings.
To review recent emails sent from Facebook:
- Go to your Security and Login Settings by clicking account in the top right of Facebook, clicking Settings & Privacy, then click Settings
- Click Security and Login.
- Scroll down to See recent emails from Facebook and click View.
Securing Your Facebook Ad Account & Business Manager
Step 1: Add 3 Admins To Your Page
Add 3 admins to your page that have verified their identities.
Steps to add people to Pages in Business Manager:
- Open Business Settings.
- Below Users, click People.
- Select the person you want to give access to.
- Click Add Assets and select Pages.
- Select the Page you’d like to share access to. Toggle on the tasks you’d like to grant to the person. Or toggle on admin access to allow them to manage the asset and perform all available tasks.
- Click Save Changes.
Step 2: Make Sure All Admins Have Verified Profiles
Give your admins these steps to submit their IDs for verification.
- Begin by opening Security Center.
- Click Confirm Identity.
- Select a type of government ID from the list. If you don’t have a photo ID you can submit, you can upload two official documents. Learn more about the types of IDs Facebook accepts.
- Upload a photo of your ID. Learn more about photo ID requirements.
- Click Next.
- Click Finish.
You’ll get a Facebook notification on your personal profile once Facebook has reviewed your ID and decided.
Step 3: Never Have Clients Add You To Their Page As An Admin
Do not have your clients add you to their page as an admin. If you are an admin Facebook deems you as an owner which can come with unexpected legal problems if things go wrong.
Instead have them give you access to their business manager as a partner.
Step 4: Verify Your Business Manager
One of the best things you can do to avoid problems with shutdowns in the future is to verify your business manager.
Follow the steps outlined on Facebook to verify your Business Manager.
Step 5: Remove Any Old Partners Or Pages Regularly
If an old ad account gets shut down that could possibly affect your business manager.
If you’re not running the ads for a particular client anymore, remove them.
Step 6: Make Sure 2FA Is On For All Users In Your Business Manager
You can force this so that anyone who uses your business manager has to have 2-factor authentication in order to log in to your business manager.
To turn on the two-factor authentication requirement:
- Start by going to Business Settings.
- Click on Business Info.
- Scroll down to Business Options.
- Click the dropdown menu next to Two-Factor Authentication.
- Select Admins only or Everyone to choose who this requirement applies to.
Wrap Up
Now that you have the steps to protect your Facebook ad account and business manager, make sure you take action ASAP!
And If there’s something you think we missed that’s an important point for business managers to safeguard their Facebook accounts let us know in the comments below!
Good luck out there!
[optin-monster slug=”ak65wqty42nvc6p0be1g” followrules=”true”]


0 Comments